I LOVE TO DESIGN

I AM

image
Hello,

I'm Honey Doe

Fusce quis volutpat porta, ut tincidunt eros est nec diam erat quis volutpat porta, neque massa, ut tincidunt eros est nec diam FusceFusce quis volutpat porta, ut tincidunt eros est nec diam erat quis volutpat porta, neque massa, ut tincidunt eros est nec diam FusceFusce quis volutpat porta, ut tincidunt eros est nec diam erat quis volutpat porta, neque massa, ut tincidunt eros est nec diam FusceFusce quis volutpat porta, ut tincidunt eros est nec diam erat quis volutpat porta, neque massa, ut tincidunt eros est nec diam Fusce

Fusce quis volutpat porta, ut tincidunt eros est nec diam erat quis volutpat porta, neque massa, ut tincidunt eros est nec diam FusceFusce quis volutpat portaFusce quis volutpat porta, ut tincidunt eros est nec diam erat quis volutpat porta


Education
University of Engineering

Bachelor of Science

College of Awesomeness

Master of Fine Arts

School of Amusement

Bachelor of Fine Arts


Experience
Lead Developer

State Art company

UI/UX Developer

Design Corporation

Front-End Developer

Creative Design Studio


My Skills
Design
Programming
Branding
Marketing

764

Awards Won

1664

Happy Customers

2964

Projects Done

1564

Photos Made

WHAT CAN I DO

Web Design

Fusce quis volutpat porta, ut tincidunt eros est nec diam erat quis volutpat porta

Responsive Design

Fusce quis volutpat porta, ut tincidunt eros est nec diam erat quis volutpat porta

Graphic Design

Fusce quis volutpat porta, ut tincidunt eros est nec diam erat quis volutpat porta

Clean Code

Fusce quis volutpat porta, ut tincidunt eros est nec diam erat quis volutpat porta

Photographic

Fusce quis volutpat porta, ut tincidunt eros est nec diam erat quis volutpat porta

Unlimited Support

Fusce quis volutpat porta, ut tincidunt eros est nec diam erat quis volutpat porta

SOME OF WORK

The Avengers Poster in Photoshop

Super Bowl is always a great time to see some nice movie trailers and previews. One that caught my attention was for the new The Avengers movie. I am looking forward to watching this movie but I also was looking forward to trying to recreate that poster in Photoshop.

So in this tutorial we will show you how to create the shine effect of The Avengers poster using only Photoshop. We will pretty much play only with Layer Styles and the Brush Tool (B).

Step 1

First thing to do is to find the Avengers logo. Just search on Google and you will find a vector version. Then in Illustrator you will have to create 2 new versions using the Object>Path>Offset Path. Use negative value for the offset. I used 2mm for both inner and outer versions.
The Avengers Poster in Photoshop

Step 2

Copy one by one from Illustrator to Photoshop so you will have 3 layers, inner, middle and outer. Hide the inner and middle and let's start creating the effect with the outer shape.
The Avengers Poster in Photoshop

Step 3

Go to Layer>Layert Style>Bevel and Emboss. Use Inner Bevel for the Style, Chisel Hard for the Technique, 140% for the Depth, 50 pixels for the Size, 3 for the Soften. For the Shading use 175º, 32º Altitude and for the Gloss Contour use the same I am using in the image below. Also change the Highlight Mode to Color Dodge with white for the color at 70% Opacity. For the Shadow Mode use Color Burn with black for the color at 100% Opacity.
After that select Color Overlay. Use #32333a for the color.
The Avengers Poster in Photoshop

Step 4

Make the middle symbol visible again and duplicate it. Hide the duplicated version for now.
The Avengers Poster in Photoshop

Step 5

With the middle version selected go to Layer>Layer Styles>Bevel and Emboss. Use Inner Bevel for the Style, Chisel Hard for the Technique, 200% for the Depth, 20 pixels for the Size, 3 pixels for the Soften. Then for the Shading use 175º for the Angle, 32º for the Altitude. Then for the Gloss Contour use the same as the image below. For the Highlight Mode use Color Dodge with white for the color at 80% and for the Shadow Mode use Color Burn with black for the color at 70%.
For the Color Overlay use the same as the previous step.
The Avengers Poster in Photoshop

Step 6

Go to Layer>Layer Style>Inner Shadow and then use Color Dodge for the Blend Mode with white for the color. For the Opacity use 80%, for the Angle use 175%, for the Distance use 20 pixels and for the Size use 30 pixels.
The Avengers Poster in Photoshop

Step 7

Make the duplicated layer visible again and apply the same inner shadow as the previous step. Also for the color overlay use #21262f.
The Avengers Poster in Photoshop

Step 8

Make the inner symbol layer visible. Then go to Layer>Layer Style>Gradient Overlay. Use #031532 for the darker color and #a4c2d6 for the lighter.
The Avengers Poster in Photoshop

Step 9

Select Stroke and then use a gradient from light blue to white with 4 pixels for the size and inside for the position.
The Avengers Poster in Photoshop

Step 10

Now it's time to add the shine effects. That is quite simple it's pretty much basic shapes masked. In this step just create 3 black ellipses and maske them so they will be visible only on top of the inner symbol
The Avengers Poster in Photoshop

Step 11

Now add a new layer on top of the others and start painting some shadows using the Brush Tool (B) with black for the color. Note that this shadows only apply for the middle and outer symbols. Also note that some areas it the shadow gets blurry. You can do that by either using a soft brush or using the Blur Tool.
The Avengers Poster in Photoshop

Step 12

Add a new layer and group it into a folder. Change the Blend Mode of the folder to Color Dodge. Select the layer and then with the Brush Tool and white for the color paint some highlights (1-5)
The Avengers Poster in Photoshop

Step 13

Add some new hightlights if necessary, in this case I highlighted the bottom part of the arrow (1-2).
The Avengers Poster in Photoshop

Step 14

Add the text you want using the Text Tool (T) and then using layer styles apply a linear gradient like the image below.
The Avengers Poster in Photoshop

Conclusion

Select all layers and duplicated them, them merge all the layers into one. Go to Fitler>Blur>Gaussian Blur. Use 10 for the radius. Change the Blend Mode to Overlay at 50%. Duplicate this layer and change the Blend Mode to Screen. The last thing here is to duplicate all the layers again and merge them into one so you can add some noise to the image.
The design is quite simple as you can see and this was just an exercise. There's still quite a few fine tunes to be made, especially the contours. But now it's up to you.
The Avengers Poster in Photoshop

Download the Photoshop file

habieb hamid Al-Muhdor

Make an Organic Coffee Retro Logo

For presentational purposes, the first thing we want to do is make a background that looks old and authentic. To do that, we used a coffee bag texture. You can grab it here for free.
Create a new document, 520x210 pixels. Copy the texture and paste it in your new document. Resize it to roughly 25% of the original size. Now, set the opacity to 30% and go to layer blending options > color. Choose a yellowish color and set the blending mode of the color to Hue. This is what we get:

Before we add the basic logo shape, grab our Photoshop Pattern Essentials pack, we'll be using it. Now, select the rounded rectangle tool and set 20px for the border radius. Create a rectangular shape in the middle of the document, roughly 40px away from all the edges of the document. See here for an example:

The base color for this shape is #bebebe. Let's edit the blending options. After you've loaded our patterns in Photoshop, go to the Pattern Overlay in the layer blending options, choose the pattern shown in the screenshot below.

After that, choose Color Overlay, set the color to #311a10 and opacity to 87%.

Copy the coffee bag texture again, and paste it on top of the shape. Resize to around 20% of the original size. Now, grab the rectangular marquee tool, and select from end to end horizontally, 70px tall. This should be your selection:

Now, copy and paste your selection. Remove the old layer below. This will leave you with a clean rectangular texture. Hit Ctrl + T (or Cmd + T). Right-click and select Skew from the options. Drag the middle blocks on the left and right to align the block as shown below:

Hit Enter to apply. Ctrl (Cmd) + Click on the brown layer below (the basic shape). This will give you a selection of that layer (make sure you are still working on the new skewed rectangle layer), now go to Selection > Inverse Selection from the menu, and hit delete on your keyboard. This will give you the following result:

Now, duplicate this layer, and set the blending mode to Multiply on the one above. Duplicate the layer again, set the Fill Opacity to 0%, and go to stroke. Set the position to Inside, size to 2px and color to #905f00.
Time to add some text. For our purposes, we grabbed the great Jungle Fever font. You can grab it from that link, it's free. Type "Organic Coffee", and select "JungleFever" as your font. Now, hit Ctrl + T (Cmd + T) again, right click and select Skew. Drag the middle squares as before, until you align the text to the inclination of the middle banner below. This is what we're aiming for:

To give it a more authentic look, we're going to play around with the blending options a bit. Set the fill opacity to 0%, and choose Pattern Overlay. We're going to be using one of our Pattern Essentials again. Choose the pattern shown below:

All we need now is to set the Color Overlay, choose black and set to 30%.

Almost done, just a couple of finishing touches left.
Duplicate the original basic shape (the brown below all of them), and move the new layer to the top of all layers. In the layer Blending Options, set the Fill Opacity to 0%, and choose Stroke. Set it to 4px, Inside and #34220a color.

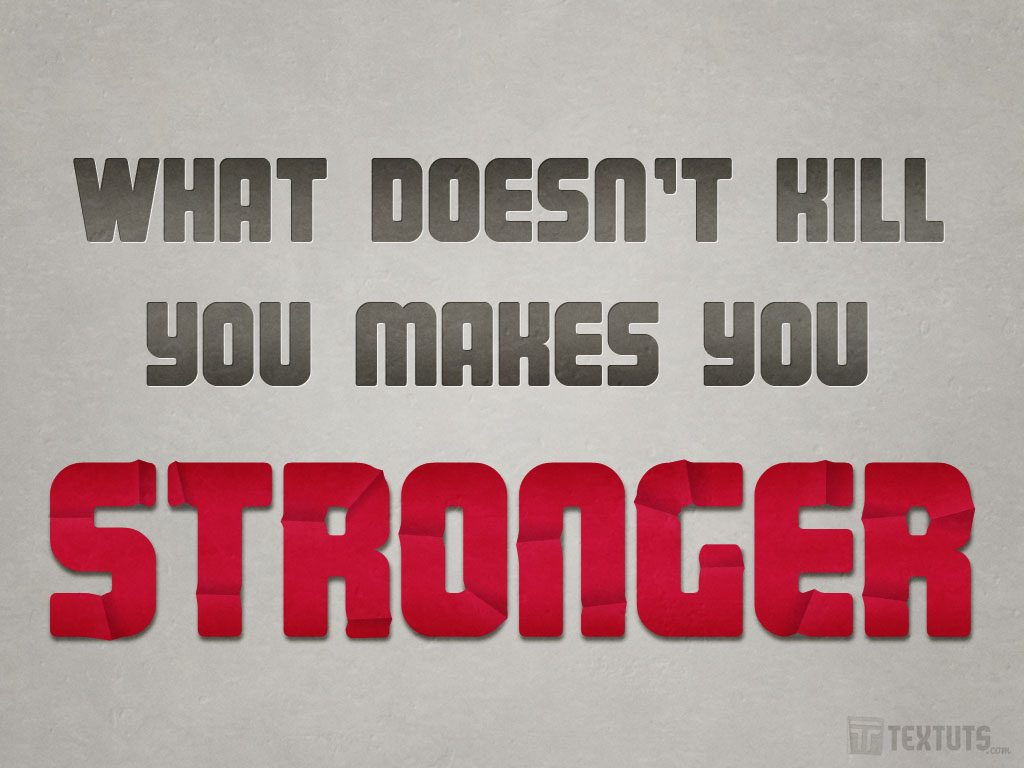
Sharp Fold Text Effect

The Final Result:
Notes:
* the software used in this tutorial is Adobe Photoshop CS5 Extended
* the size of the final result image is 1024 * 768
* you might want to check the Basix Page to see some useful topics on dealing with Photoshop basics, such as loading palettes and some shortcuts.
Resources:
* Grungy seamless tiling cement by ~LANBO.
Step 1:
- Set the Foreground color to #dbdbdb, and the Background color to #bcbcbc, then, create a Radial Gradient from the center of the document to one of the corners.
Sharp Fold Text Effect step 1
- Create the text using the color #7b7b7b. The font used is Magnum and the Size is 250 pt.
Sharp Fold Text Effect step 1
- Duplicate the text layer, and change the copy’s font color to #c91544. Make the original text layer invisible (click the eye icon next to it).
Sharp Fold Text Effect step 1
- Right click the copy text layer and choose Convert to Shape.
Sharp Fold Text Effect step 1
- This will convert the Text layer to a Shape layer. The thumbnail to the left is the Fill color, and you can double click it to change the color anytime you want to. The thumbnail to the right is the Layer Mask, and it shows the shape of the path that defines what’s visible on the layer.
* Make sure to click the Layer Mask before modifying the path.
Sharp Fold Text Effect step 1
Step 2:
- Pick the Direct Selection Tool. This is the tool we will be using to move any points on the path.
Sharp Fold Text Effect step 2
- Click and drag to select the anchor points of the first letter.
Sharp Fold Text Effect step 2
- The anchor points are the points that control the path. Adding, deleting, or moving any of them will change the shape of the path. Try to add the folds where there aren’t many really close anchor points.
Sharp Fold Text Effect step 2
- Pick the Add Anchor Point Tool to start adding the fold’s anchor points. Each fold will need 3 anchor points on each side. The ones to the right and left are where the fold begins and ends (yellow highlight), and the ones in the middle control the actual fold (blue highlight).
Click to add the 6 anchor points on each side. Don’t worry about aligning the points perfectly, you can even leave different spaces between the anchor points to create a more “tilted” fold.
Sharp Fold Text Effect step 2
- Pick the Direct Selection Tool once again, click and drag to select the anchor points in the middle (or Shift + Click them).
Sharp Fold Text Effect step 2
- Use the Up arrow key (the Move Tool (V) should be the active tool) to move the selected anchor points slightly upwards.
When creating the Horizontal folds, you should move the fold to the Right instead.
Sharp Fold Text Effect step 2
- Repeat the same steps to create more folds wherever you want.
Sharp Fold Text Effect step 2
Step 3:
- Create two new layers on top of all layers, and call them “Light” and “Dark”. We will be using them to add the gradients to the sides of the fold.
Sharp Fold Text Effect step 3
- Set the “Light” layer’s Blend Mode to Soft Light and its Opacity to 30%.
Sharp Fold Text Effect step 3
- Set the “Dark” layer’s Blend Mode to Multiply.
Sharp Fold Text Effect step 3
Step 4:
- Press Ctrl and click the Shape Layer’s Mask thumbnail to create a selection.
Sharp Fold Text Effect step 4
- Pick the Polygonal Lasso Tool and click the Intersect with Selection icon in the Options bar.
Next, create a selection that intersects with the right half (side) of the fold.
Sharp Fold Text Effect step 4
- Make sure that the “Dark” layer is selected (active).
Sharp Fold Text Effect step 4
- Pick the Gradient Tool, and click the Linear Gradient icon in the Options bar. With the Foreground color set to #dbdbdb, choose the Foreground to Transparent gradient, and fill the selection starting from the middle of the fold.
Sharp Fold Text Effect step 4
- The Multiply Blend Mode set previously will make the gradient look like a shadow covering the selected area.
Sharp Fold Text Effect step 4
- Select the shape once again (Ctrl + Click the thumbnail), and use the Polygonal Lasso Tool to create a selection that intersects with the left half of the fold.
Sharp Fold Text Effect step 4
- Select the “Light” layer this time, then fill the selection with the gradient.
Sharp Fold Text Effect step 4
- This will brighten the left side of the fold a little bit.
Sharp Fold Text Effect step 4
Note: Try not to include the areas separated by corners in the selection, and avoid dragging the Gradient outside the selection as well.
Sharp Fold Text Effect step 4
- Doing so will result in hard disconnected gradient fills.
Sharp Fold Text Effect step 4
- Just make sure that the selected areas are contiguous, and that the gradients end near the edge of the selection.
Sharp Fold Text Effect step 4
- This will make the gradient fills look more smooth and realistic.
Sharp Fold Text Effect step 4
- Do the same for all the remaining folds. Remember, the parts bending up should be lighter, and the ones going down should be darker. Simply, apply the Gradient fills clockwise to all the folds.
Sharp Fold Text Effect step 4
Step 5:
- Make the original text layer visible.
Sharp Fold Text Effect step 5
- Right click the original text layer and choose Rasterize Type.
Sharp Fold Text Effect step 5
- This will reasterize the text layer, which means you will not be able to modify the text anymore. You can use Smart Objects instead if you like.
Sharp Fold Text Effect step 5
- Go to Filter -> Blur -> Gaussian Blur, and set the Radius to 2.
Sharp Fold Text Effect step 5
- Set the rasterized text layer’s Blend Mode to Multiply. Pick the Move Tool, and use the Arrow Keys to move the text a little bit downwards and to the right, in order to create a simple shadow.
Sharp Fold Text Effect step 5
Step 6:
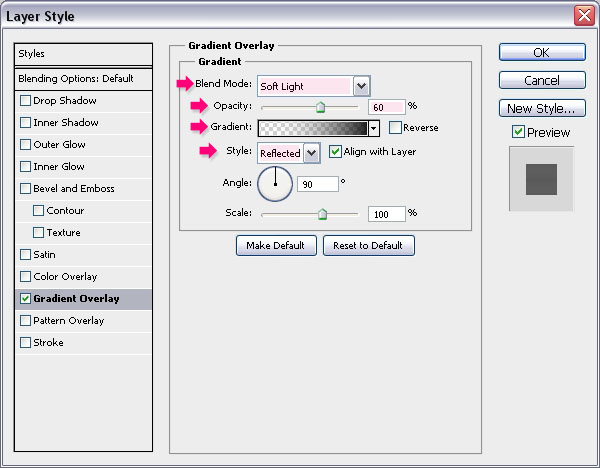
- Double click the Shape layer to add a simple Gradient Overlay. Change the Blend Mode to Soft Light, the Opacity to 60%, and the Style to Reflected. then click the Gradient Box to create the Gradient.
Sharp Fold Text Effect step 6
- The Gradient used is a very simple one. Click each one of the Color Stops (at the bottom of the Gradient bar), then click the Color box below, and set the colors to #ffffff and #000000.
Sharp Fold Text Effect step 6
- Now, click each one of the Opacity Stops (at the top of the Gradient bar) to set the Opacity values to 0% and 100%.
Sharp Fold Text Effect step 6
- This will add a nice gradient to the text.
Sharp Fold Text Effect step 6
- Finally, place the Grungy seamless tiling cement texture on top of all layers, and change its layer’s Blend Mode to Soft Light.
Sharp Fold Text Effect step 6
That’s it!

Start Work With Me

Contact Us
JOHN DOE
+123-456-789
Melbourne, Australia

Featured Listings

20.000+ Bungalows 1.000+ Appartments

Search : Homes, Penthouse, Farmhouse etc.

Pages